
A Simple Guide to Github
13 Sep 2019
Git ?
Let’s assume that you have to submit a report as a group for your science class. In this case, you would want to split the works. Different roles and responsibilities can be assigned to each person. Some might focus on doing research and gathering information, some can just write with the collected information and others might do the presentation.
However, let’s say the professor required everyone in the team to take part in writing the report. In this case, many problems can be expected:
-
“Who wrote this paragraph?”
-
“I accidently deleted our file… do you have any backup files?”
-
A: “Hey I am done with my part. I will just have to merge mine with yours”
B: “Actually, I updated my stuff. I will send you a new version of my work”
-
A: “Hey your writing has some typos. I corrected them”.
B: “But I revised my part yesterday, and the content also changed”
A: “Why did you change it?”
B: “Because some of my contents were contradicting your part”
When it comes to a collaborative work and especially when the size of group gets bigger, it is hard to keep track of who did the work, and what the newest version of each other’s work is. Also, how to update the work and resolve conflicting contents can be confusing.
Git is “a free and open source distributed version control system designed to handle everything from small to very large projects with speed and efficiency”. Easily saying this, it is a software used to manage and control versions of your project. Also, it is very useful to keep track of who made the changes and updates. It also provides search functionality which facilitates your work. In terms of development, git is by far the most popular platform to do your coding projects.
Github is a platform where gits are uploaded. (Hub of gits!) It is “a code hosting platform for collaboration that lets you and others work together on projects from anywhere”, according to the service’s own introduction. Github users can share, review, collaborate, fork (copying and experimenting) on other’s projects. It is more like a social networking platform for developers too.
Installation
Check here for installation (the official git website)
How it works
In order to use git, you need to understand how git works. Here are some new words that you should get used to:
- Local Repository
- Remote Repository
- Staging Area (Index)
And the diagram below explains the basic flows of git:
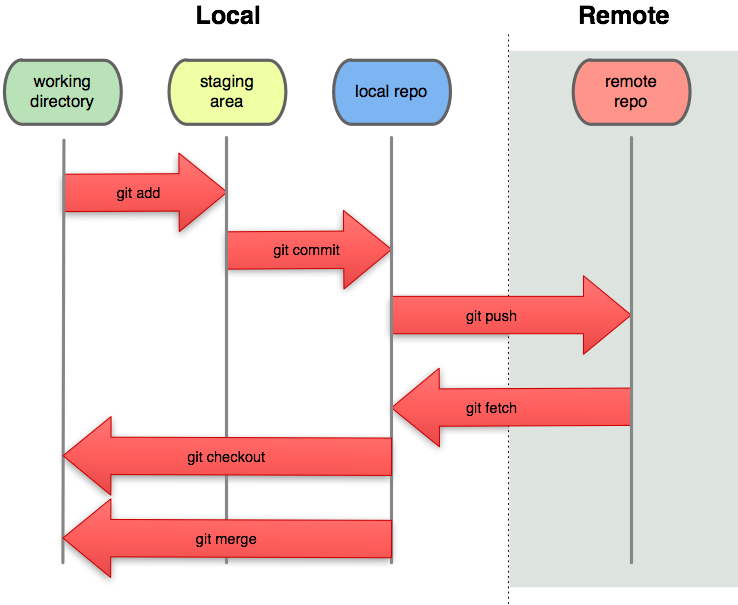 source: https://pismute.github.io/whygitisbetter
The local area is your computer that you are working on (probably where your git is installed). The remote area is the git server where your uploaded files are saved.
Repository is your project, a data structure that git has. If you want to start a new project, you have to create a new repository. Git controls the repository version by thinking of data like snapshots. It does not store the file itself, but remembers how it looked like.
Staging area is a simple file where the snapshots of your files are stored. It contains information about what changes to upload to the remote repository. Think of it as a purgatory before reaching heaven (Remote repository or Github server).
Creating Repository
There are two ways to create a repository:
- Create a repository on your local area (your computer) and initialize git. Then create a new repository on Github and use git commands to set the location of remote repository that you created on Github
- Create a repository on remote area (through Github.com) and git clone to local area
Step 2 seems simpler, but if you have an existing project that you would like to upload, first way would be more convenient.
Method 1. Uploading Existing Projects
First, you need a remote repository on Github to store your project. Sign in to Github, and go to repositories tab. (should be easy to find) Then, you will see this in your screen:
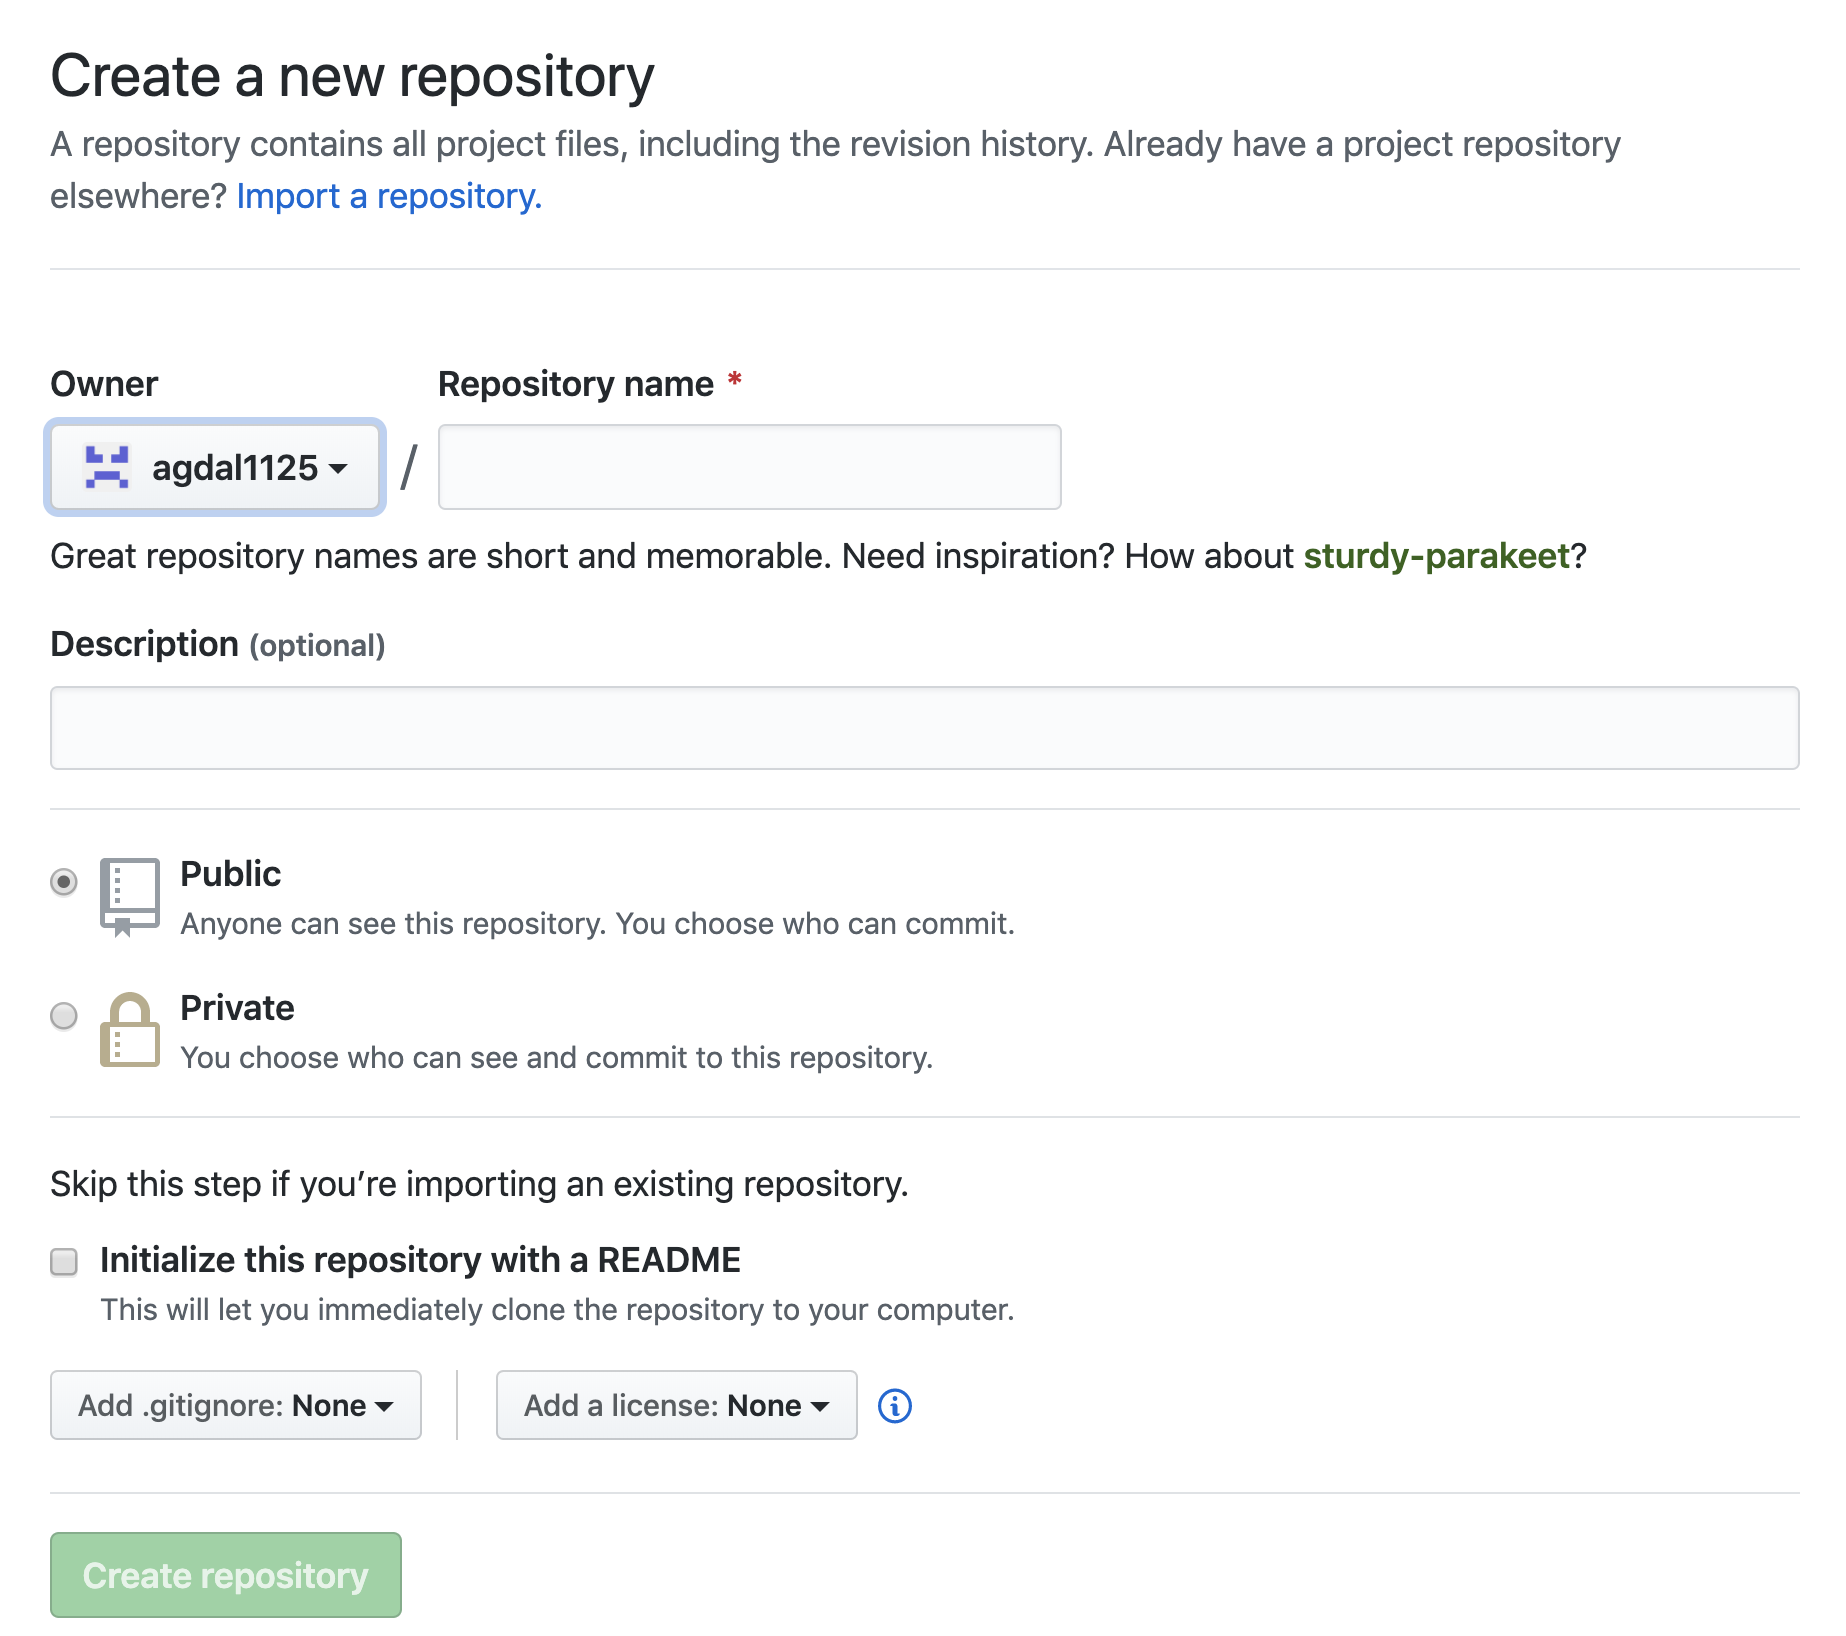
Fill in the repository name, description of your project and create the repository. (**DO NOT CHECK **Initialize this repo with README)
Once you create your remote repository, you should be able to see a url that looks like this:

Remember this url because you need this to set your location of remote repository!
Finally, you are ready to upload your files from your local repository to remote repository. Just follow the command lines below:
# Change directory to the location of your project
$ cd /Desktop/your_project_directory/

# Initiate git
$ git init

# Add all the files in your current directory (staging)
$ git add .

# commit the files
$ git commit -m "Write any Comments or Notes"

# Locate your remote repository
$ git remote add origin git@github.com:username/project.git

# pushes the changes in local repo to remote repo
$ git push -u origin master
If you followed the steps successfully, you can go back to Github and check that your files are there!
Method 2. Creating a New Project
The process above is more complicated than this option. If you want to create a new project, you can create a remote repository and copy (clone/download) it into your local machine:
First, you need a remote repository on Github to store your project. Sign in to Github, and go to repositories tab. (should be easy to find) Then, you will see this in your screen:
Fill in the repository name, description of your project and create the repository. (**CHECK **Initialize this repo with README)
Type in the commands below:
# Change directory to where your project should be
$ cd /Desktop/My_projects/Project_1/

# Clone remote repo into your local machine.
# This becomes your local repo
$ git clone git@github.com:username/project.git
Now, you will see that a folder was created with the same name of your remote repository on the Github. You can start your project there.
Updating Your Work
If you made changes to your project and want them updated to your remote repository, only three lines of codes are required:
# Add all the files in your current directory (staging)
$ git add .

# commit the files
$ git commit -m "Write any Comments or Notes"

# pushes the changes in local repo to remote repo
$ git push -u origin master
You can also make changes in the Github directly. However, if the changes are made in the remote repository directly, you would have to update your local repository. If you don’t, you won’t be able to commit or push your updates because the staging area sees that the “snapshots” they have in local repo is not consistent with the ones from remote repo. See the next section for how to resolve this problem.
Resolving Version Conflicts: Fetching/Pulling
If have a remote repository that has fresher version than your local repository. you will have to apply or make updates for the consistency of versions between the two repositories. In a short way, you need to download new stuffs on your local repository, just like a game patch. You cannot join and play others if you have an outdated version of your game. There are two ways of doing this:
$ git fetch origin

or

$ git pull origin master
Here’s a simple explanation. Pulling does more than fetching. It “fetches” and then “merges” to update your repository. Pulling “automatically merges the commits without letting you review them first”. If you are not involved in managing branches, pulling is recommended.
![]()
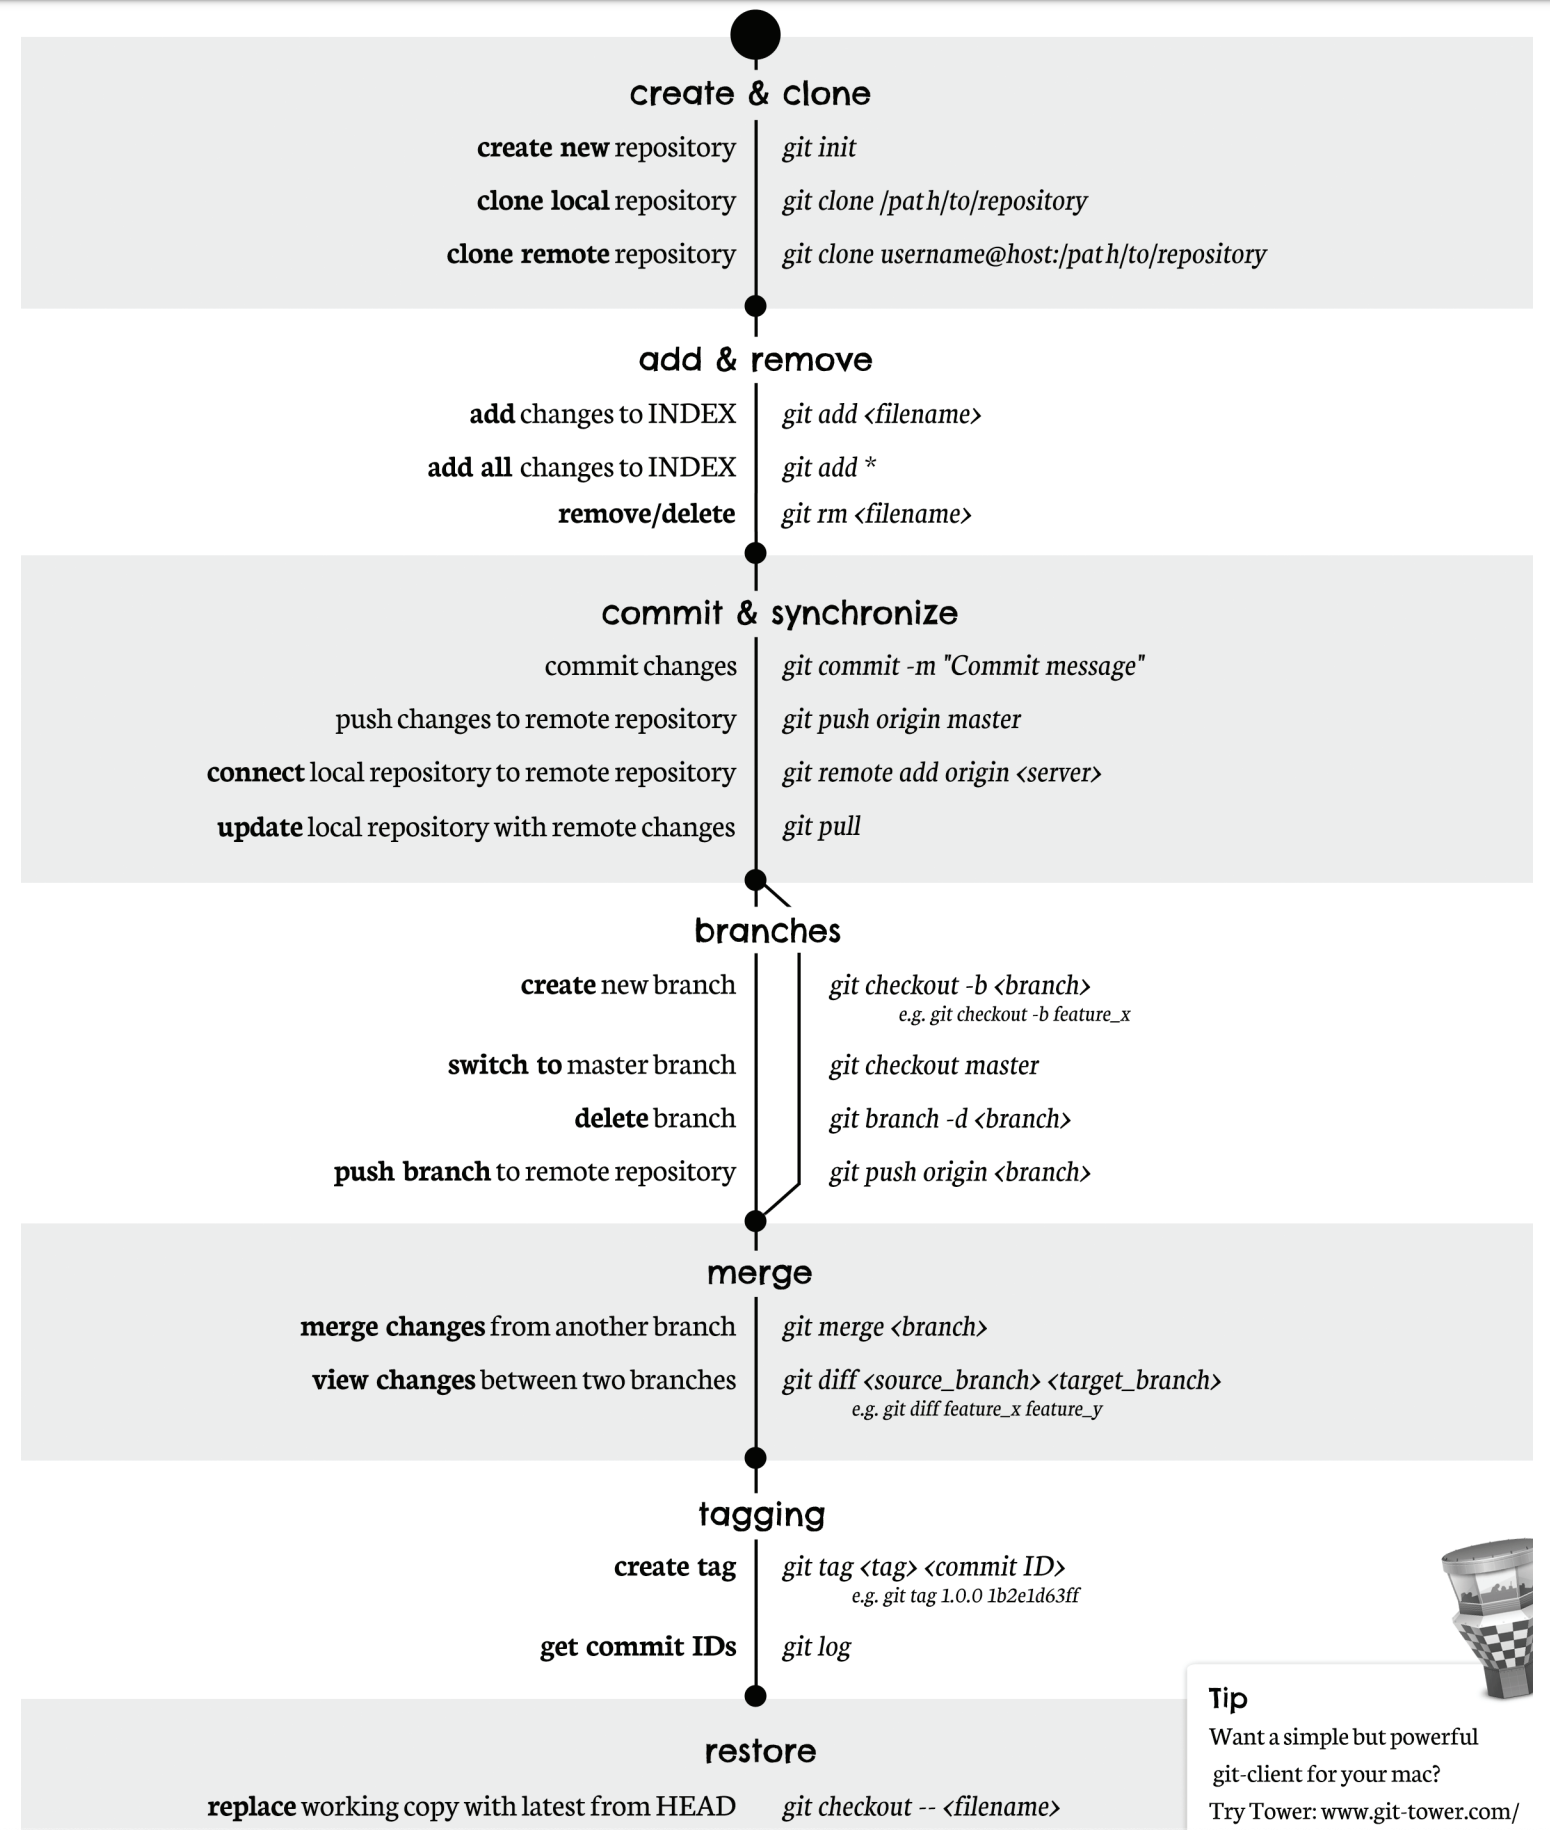
Github Cheatsheet
FYI, Here’s a cheatsheet of git command lines!
Resources & References:
- https://rogerdudler.github.io/git-guide/index.html
- https://kbroman.org/github_tutorial/pages/init.html
- https://help.github.com/en/articles/adding-an-existing-project-to-github-using-the-command-line
- https://stackoverflow.com/questions/292357/what-is-the-difference-between-git-pull-and-git-fetch
- https://blog.osteele.com/2008/05/my-git-workflow/